- A Quick Guide to Growth Habits: First, Figure Out What You’re Dealing With
- When to Sow: Wait Until the Soil Warms Up
- Choosing a Container: Depth Is More Important Than Width
- Soil Mix: Never Use Soil from Your Yard
- Sowing and Setting Up Supports: The Order Matters
- Watering and Mulching: Consistency Is More Important Than Quantity
- Fertilization: Less Is More
- Daily Care: Three Simple Steps for a Bountiful Harvest
- Harvesting: Seizing the Optimal Window
- Companion Planting: Finding a Good Neighbor for Green Peas
- Pests and Diseases: Prevention Is Far Better Than Cure
Green beans are one of the most beginner-friendly warm-season vegetables for home gardens. They’re nutritious, produce consistently, are extremely forgiving for beginners, and thrive in containers—even if you only have a small balcony, a windowsill, or a corner of your rooftop, you can still grow them into a lush, thriving plant, which is exactly what you want when learning how to grow green beans in containers.
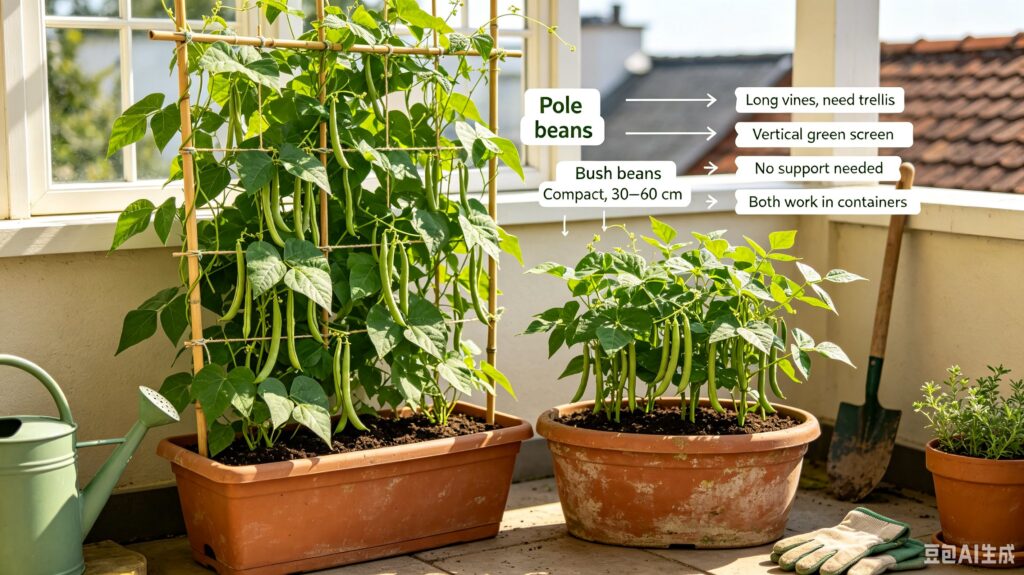
Green beans fall into two main categories: pole beans and bush beans. The former have long vines that require a trellis to climb; they are the stars of vertical gardening and can form beautiful green screens. The latter have a compact growth habit, typically ranging from 30 to 60 centimeters in height, and require no support, making them the best starting point for balcony gardeners. Both are suitable for container gardening; which one you choose depends on your available space and care preferences.
A Quick Guide to Growth Habits: First, Figure Out What You’re Dealing With
Green peas are annual warm-season crops that thrive in warm conditions and are not frost-tolerant. Understanding their basic needs provides the foundation for all subsequent care.
The optimal growing temperature for green peas ranges from 18°C to 29°C. If temperatures consistently exceed 29°C, flowers are prone to dropping, and yields will drop significantly.
In terms of sunlight, they require at least 6 to 8 hours of direct sunlight daily. Insufficient light causes the plants to become leggy, resulting in fewer flowers and sparse pods.
From sowing to the first harvest, it generally takes 45 to 65 days, depending on the variety. They prefer slightly acidic to neutral soil with a pH ranging from 6.0 to 7.0.
In terms of hardiness zones, green peas are suitable for cultivation in USDA Zones 3 through 10, but this is of little practical significance for container gardening—since containers can be moved as temperatures change. What truly matters is the golden rule: “Plant only after the last frost.”
When to Sow: Wait Until the Soil Warms Up
Green peas are quite sensitive to cold temperatures and frost. If sown too early, the seeds will rot in cold, wet soil, or the seedlings will die from a late spring frost after they emerge.
The safe planting window is after the last spring frost has passed and the soil temperature has stabilized at around 21°C. You can measure this with a soil thermometer, or keep it simple—when people in your area start planting tomatoes, that’s the time to plant green peas.
Green peas are almost exclusively direct-sown, meaning the seeds are sown directly into containers. Their root systems are extremely sensitive to transplanting, and the survival rate of transplanted seedlings is much lower than that of direct-sown plants.
If you’re concerned about germination rates, you can soak the seeds in warm water for 2 to 4 hours before sowing; this helps soften the seed coat and speed up germination. However, don’t soak them for more than 12 hours, or the seeds will rot due to lack of oxygen.
Choosing a Container: Depth Is More Important Than Width
The size of the container directly determines the yield. Green bean roots need sufficient soil depth to spread out; if the pot is too small, the roots will stop growing once they hit the pot’s walls, causing a sharp drop in yield.
Climbing beans require a container at least 20 to 23 centimeters deep, while bush beans need one 15 to 18 centimeters deep. The rule of thumb: You can’t go wrong with a large container for growing vegetables— the larger the pot, the more soil it holds, the better it retains moisture, and the more comfortable the roots will be.
In terms of materials, unglazed clay pots, wooden boxes, and buckets are all good choices. Unglazed clay pots better regulate humidity and evaporation, preventing the roots from sitting in water; plastic and metal pots can also be used, but their walls can get very hot under direct summer sun, so be sure to provide shade and adjust your watering frequency accordingly.
The bottom of the container must have 2 to 3 drainage holes, and the holes should not be too large. You can cover the drainage holes with wire mesh or plastic netting to prevent soil loss, or lay a layer of small pebbles about 2.5 centimeters thick at the bottom of the pot to serve as a drainage layer.
If you have limited space, planting 3 dwarf bean plants in a 5-gallon (about 19-liter) container, or 3 to 4 climbing bean plants in a 10-gallon (about 38-liter) deep pot, are both proven to be appropriate planting densities.
Soil Mix: Never Use Soil from Your Yard
This is the most common mistake beginners make. Many people think, “It’s just soil—I’ll just dig some up from the flower bed downstairs,” but as a result, the potting soil quickly becomes compacted, the roots suffocate, and the peas grow listlessly.
For container gardening, you must use a specialized potting mix; never use regular garden soil. Garden soil is too heavy and drains poorly; it will quickly compact in a container, “suffocating” the root system.
A recommended DIY soil mix is equal parts compost, garden loam, and clean coarse sand, with an appropriate amount of well-rotted organic fertilizer, all thoroughly mixed. Another, lighter-weight formula is: peat moss (or compost) + perlite + sterilized soil, mixed in a 1:1:1 ratio.
The soil’s pH should fall between 6.0 and 7.0. If you’re unsure, you can purchase a household pH test kit to check. If the soil is too acidic, add some lime; if it’s too alkaline, mix in peat moss or well-rotted compost.
Once the soil is prepared, water it thoroughly once to ensure the growing medium is completely saturated and has settled, then begin sowing.
Sowing and Setting Up Supports: The Order Matters
There’s a crucial detail to this step: set up the supports first, then sow the seeds. This is especially important for climbing beans—if you wait until the seedlings have sprouted to insert trellises or bamboo tripods, you’ll easily damage their delicate root systems.
Place a trellis, bamboo tripod, or tomato cage in the center of the container. Since climbing bean vines can grow 1.8 to 2 meters tall, the support must be sturdy and tall enough.
Sow the seeds about 2.5 centimeters deep. Scatter climbing bean seeds around the support, spacing them 5 to 7.5 centimeters apart; for bush beans, space the seeds 10 to 15 centimeters apart. After sowing, cover the seeds with about 2.5 centimeters of soil and gently press it down.
Move the container to a sunny spot. For the first 2 to 3 weeks after sowing, keep the soil surface consistently moist but avoid waterlogging; thereafter, water only when the topsoil feels dry. Generally, sprouts will emerge within 5 to 8 days.
Watering and Mulching: Consistency Is More Important Than Quantity
Green peas have a high water content and are quite sensitive to moisture levels. Water deficiency can cause flowers to drop and pods to become misshapen, while waterlogging can lead to root rot and fungal diseases.
The general rule for daily watering is: water when the soil is dry 2 to 3 centimeters below the surface. The most direct way to check is to insert your fingertip into the soil to gauge its moisture level.
Water thoroughly until water flows out of the drainage holes at the bottom of the pot. However, any standing water in the tray must be poured out; never allow the pot to sit in water for extended periods.
Green peas are most sensitive to moisture during the flowering stage—if the soil dries out at this time, flowers will drop off in large numbers, directly leading to reduced yields. Therefore, once flowering begins, pay extra attention to water supply; typically, water every 2 to 3 days, though daily watering may be necessary during hot weather.
Once the seedlings emerge, it is recommended to apply a layer of mulch approximately 2.5 centimeters thick over the surface of the potting soil. Hay, shredded bark, or coconut coir are all suitable options. Mulching offers three benefits: it retains moisture, suppresses weeds, and moderates soil temperature. Be sure not to place the mulch directly against the base of the stems; leave a gap of a few centimeters.
Fertilization: Less Is More
Green beans belong to the legume family; their root systems form a symbiotic relationship with rhizobia, allowing them to fix nitrogen from the air on their own. This means they don’t need much nitrogen fertilizer—in fact, using the wrong fertilizer can cause the plants to “grow excessive foliage without producing pods.”
The key principle is: apply dilute fertilizer frequently, and err on the side of less rather than more. A monthly application of diluted liquid fertilizer or well-rotted compost tea is sufficient.
If you’ve already added a sufficient amount of well-rotted organic fertilizer to the potting mix, you may not even need to apply additional fertilizer during the growing season. The criteria for determining whether the plants are lacking nutrients are: deep green leaves and vigorous growth = no nutrient deficiency; yellowing leaves and slow growth = mild nutrient deficiency.
Absolutely avoid using high-nitrogen fertilizers (such as urea or high-nitrogen compound fertilizers). Excessive nitrogen is the most common mistake when growing green beans on a balcony, resulting in “leaves taller than a person, but very few pods.”
Daily Care: Three Simple Steps for a Bountiful Harvest
Caring for green beans is extremely simple—just follow these three steps:
First, pinch back the tips. For climbing beans, when the vines reach about 1.5 meters, pinch off the growing tips at the top to redirect the plant’s energy from “growing taller” to “producing pods.” This technique works the same way as pinching back tomato plants.
Second, harvest regularly. Start harvesting when the pods reach 7.5 to 10 centimeters in length—don’t wait. Regular harvesting stimulates the plant to continue flowering and producing pods, significantly extending the harvest period and increasing total yield.
Third, weed carefully. Weeds may occasionally sprout in the container; take extra care when removing them—green peas have shallow root systems, and applying too much force can damage the main root. The safest method is to gently pinch the base of the weed with your fingers and pull it out at an angle.
Harvesting: Seizing the Optimal Window
Dwarf beans and climbing beans have completely different harvesting schedules and require different approaches.
Dwarf beans generally reach peak production 45 to 60 days after sowing. They are characterized by a single, concentrated ripening period—pods will grow in large numbers over the course of a few weeks, after which production gradually stops. When harvesting, part the layers of green leaves and carefully search for the pods hidden inside—it’s like a treasure hunt.
Climbing beans, on the other hand, produce continuously throughout the growing season. As long as you harvest them regularly, they’ll bear fruit from early summer all the way through the first frost of fall. This is why many experienced balcony gardeners prefer climbing beans—their total yield per unit of space is far higher than that of bush beans.
The best time to harvest is when the pods are 7.5 to 10 centimeters long, and the beans have just begun to fill out but haven’t yet made the pods bulge. At this stage, the pods are crisp, tender, and fragrant, offering the best flavor.
Companion Planting: Finding a Good Neighbor for Green Peas
Green peas are the “model citizens” of companion planting—they fix nitrogen and nourish their neighbors; at the same time, they need good neighbors to repel pests, provide shade, and improve the microclimate.
Ideal companions include: beets, borage, cabbage, carrots, cauliflower, corn, cucumbers, dill, eggplant, kale, marigolds, nasturtiums, cherry radishes, and sage. Among these, the combination of corn, green peas, and squash is the famous “Three Sisters” planting method: the green peas fix nitrogen to feed the corn, the corn stalks serve as trellises for the green peas, and the squash leaves cover the ground to retain moisture and suppress weeds.
The plants you should avoid most are those in the Allium genus—onions, garlic, scallions, and chives. Substances secreted by Allium plants inhibit the activity of the nitrogen-fixing bacteria in green peas, leading to reduced nitrogen fixation efficiency and stunted growth in both plants. On a balcony, keep their containers at least 1 meter apart.
Marigolds are the best flowers to place next to a pot of green peas—their root exudates repel nematodes, and their flowers attract beneficial insects, making them the green peas’ “all-around bodyguards.”
Pests and Diseases: Prevention Is Far Better Than Cure
Green peas generally have good disease resistance, but they can still encounter some problems during the hot and humid summer months. Common issues include:
Pests: Aphids, slugs, armyworms, bean beetles, and spider mites.
Diseases: Anthracnose, rust, wilt, downy mildew, powdery mildew, root rot.
The key to prevention is actually quite simple: maintain good air circulation and avoid water pooling on the leaves. Do not place potted plants too close together. When watering, aim for the soil rather than the leaves, and if watering in the evening, allow ample time for the leaves to dry before nightfall.
During routine inspections, focus on the undersides of the leaves—pest eggs and larvae often hide there. If you find a small number of aphids, rinsing the undersides of the leaves with a strong stream of water will solve most of the problem; bean beetles can be removed by hand; in severe cases, you can use neem oil or insecticidal soap for organic control.
⚠️ Avoid using synthetic chemical pesticides whenever possible. This is partly for food safety reasons and partly because the confined space of a balcony means chemical agents can easily affect your living experience. Relying primarily on physical and biological control methods, combined with regular inspections, is sufficient to manage the vast majority of pests and diseases.
If you find diseased leaves, cut them off immediately and remove them from the balcony for disposal; never leave them on the surface of the potting soil to prevent the spread of pathogens.
Successfully growing green beans on your balcony essentially comes down to following five key guidelines: sow seeds after the last frost, choose the right-sized container, use specialized potting soil, keep the plants well-watered during the flowering period, and harvest the pods frequently while they’re still tender.
Next, head to a garden center and pick out a bag or two of seeds. Among dwarf varieties, ‘Blue Lake’ and ‘Topcrop’ are both highly recommended; among climbing varieties, ‘Kentucky Wonder’ and ‘Fortex’ perform exceptionally well in container gardening. Plant them, and in 45 days, you’ll be able to harvest your first batch of homegrown green beans, fresh from the sun.